
A smart plug that no longer responds to the app, holds an old SSID after a router change, or shows a stuck status LED needs a factory reset. The hard reset procedure varies significantly by brand and is rarely documented clearly on the product packaging.
This guide covers the exact hardware button-hold patterns and post-reset re-pairing workflows for the dominant smart plug brands sold in North America and Europe.
Background and Technical Context
A factory reset completely wipes the smart plug’s locally stored Wi-Fi credentials, existing cloud account bindings, and internal schedule cache. The onboard microcontroller returns to its first-pair commissioning state, broadcasting a localized SoftAP or listening via EZ Mode discovery protocols for a fresh handshake.
- LED pattern in pairing mode: Rapid blue, green, or amber blinking (dependent on vendor chipsets).
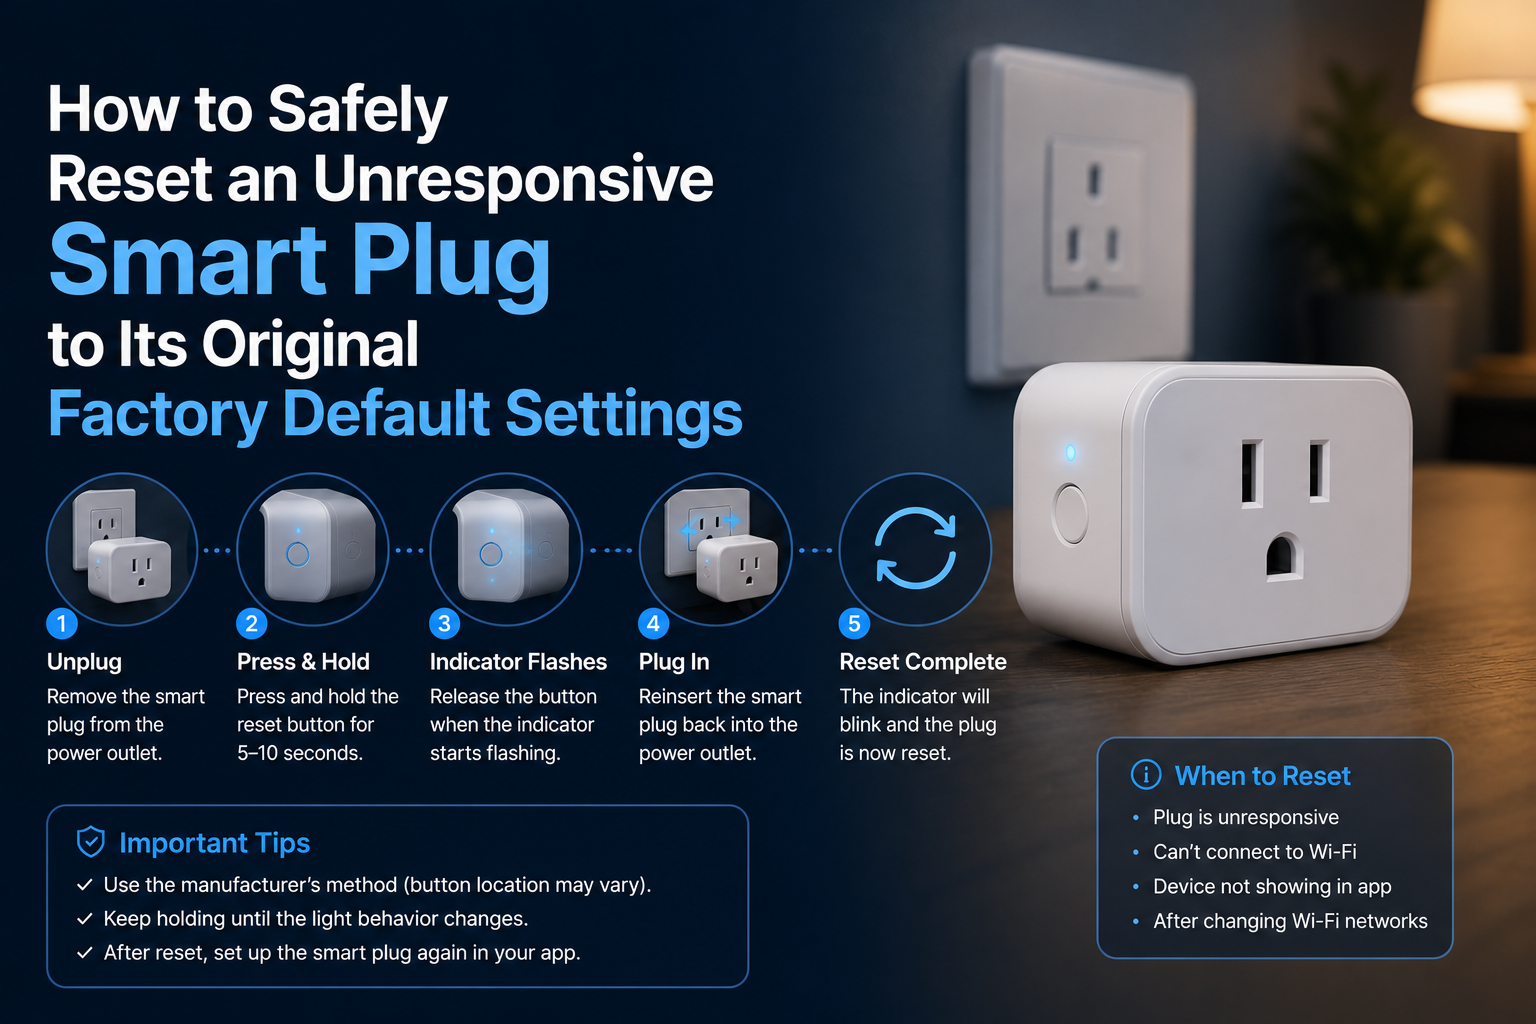
- Reset duration: A 5 to 15-second physical button hold is standard across the industry.
- Post-reset SoftAP SSID format: Commonly unencrypted and vendor-named (e.g., SmartLife-XXXX or Kasa_Plug_XXXX).
- Schedule retention: Completely lost during hardware reset; automation logic must be rebuilt post-pairing.
Before Resetting: Try Less Invasive Steps
- Execute a hard power cycle: Unplug the device from the wall outlet for a full 30 seconds, then re-plug. Many transient connectivity lockups clear during this drain period.
- Reboot your local network router and wait 5 minutes for the plug’s wireless client interface to attempt re-authentication.
- Check your companion smart home platform application for any pending background firmware updates.
- Verify whether the smart plug’s MAC address appears as active within your router’s DHCP assignment table.
Wi-Fi Smart Plug Reset Procedures
TP-Link Kasa and Tapo Ecosystems
Kasa Models (KP125, KP400, HS103)
Press and hold the physical side power button down for exactly 10 seconds. Watch for the diagnostic LED to rapidly flash amber and then green. Release the button immediately; the plug is now ready for fresh staging.
Tapo Models (P100, P110)
Press and hold the dedicated control button down for 5 seconds. Release when the LED indicator shifts to an amber blink pattern, signifying entry into pairing mode.
Wyze Plug Hardware
For the standard Wyze Plug (WLPP1CFH), press and maintain pressure on the integrated button for 5 seconds. Release the button once the status LED starts flashing blue exclusively.
Tuya / Smart Life Generic Platforms
The vast majority of unbranded white-label plugs built on the Tuya platform share a standardized logic engine. Press and hold the primary power button for 5 to 10 seconds until the diagnostic LED flashes rapidly.
Note: Some variants support two separate staging topologies. A rapid blink indicates EZ Mode discovery, while a slow blink denotes AP Mode setup. Long-press the button a second time to actively toggle between these two configuration modes.
Zigbee Smart Plug Reset Procedures
Aqara Smart Plug
Aqara modules utilize low-power Zigbee meshes and require a distinct re-pairing trigger. Press the primary control button quickly 5 times within a 5-second window. The LED will blink blue rapidly. At this point, initialize a fresh inclusion request through the Aqara app or your local Zigbee2MQTT permit-join interface link.
Apple HomeKit-Native Ecosystems
HomeKit-native options (such as Eve Energy or iHome hardware) reset using the same physical button-hold patterns as their standard Bluetooth/Thread profiles. Once wiped, they must be re-added to the native iOS Home app using the unique 8-digit HomeKit setup matrix printed on the chassis or the original setup card.
Post-Reset Re-Pairing Workflow
- Launch the official hardware vendor app associated with the target accessory.
- Select the Add Device utility inside the management dashboard.
- Manually choose your specific plug model layout from the device catalog.
- Follow the step-by-step in-app deployment flow, ensuring your 2.4 GHz Wi-Fi network password is entered correctly.
- Apply the latest vendor firmware compilation immediately after successful database initialization.
- Reassign the device to its corresponding virtual room, group, or automation scene matrix.
Troubleshooting Failed Reset Sequences
- The diagnostic LED never enters a fast-blink pattern: The physical microswitch contacts on the internal PCB may be warped or broken.
- The plug enters pairing mode, but the host application fails discovery: Verify your smartphone is connected to a dedicated 2.4 GHz wireless broadcast lane. Most smart plugs lack 5 GHz radio components.
- The plug pairs successfully but drops offline within seconds: Check for a localized account registration region mismatch inside the profile configuration.
- Firmware update loops or fails during staging: Temporarily move the plug to an outlet directly adjacent to your primary Wi-Fi access point to maximize signal fidelity.
A smart plug that fundamentally refuses to initiate an LED state change after multiple independent button-press hold cycles is experiencing irreversible component lockup or power surge damage. In these scenarios, replacing the hardware module is the only remaining viable option.
Key Takeaways
- Exhaust basic power cycles and upstream router reboots prior to issuing a complete factory reset.
- Hardware reset patterns vary by platform, with a continuous 5 to 10-second physical hold serving as the baseline standard.
- Look for a definitive transition from a steady state or slow strobe to a rapid, erratic blink pattern to confirm a successful wipe.
- Always patch the device to the newest firmware revision immediately following successful re-inclusion.
- If hardware refuses to alter its LED signaling after multiple independent holding attempts, the module is likely bricked.
Long-Term Field Notes From Our Bench
Long-running deployments behave differently than single-day bench tests. A configuration that looks flawless in week one starts revealing edge cases by month three: firmware updates change defaults, neighbor Wi-Fi shifts onto your channel, batteries drift toward end of life, and household behavior evolves around the automation rather than the other way around.
We track three metrics on every long-term test rig: command success rate (percentage of actions that complete without retry), end-to-end latency from trigger to outcome, and operator intervention count (how often a human had to touch the system to keep it running). A healthy deployment holds command success rate above 99 percent, latency under 1.5 seconds, and zero interventions per month.
Drift away from those numbers usually signals an upstream change. This could be new router firmware that re-enables band steering, a vendor cloud rolling out a stricter rate-limit, or a sensor battery dropping past the threshold where it starts misreporting before complete failure. Catching drift early prevents the kind of compound failure that takes the whole automation offline at the worst time.
Document changes as you make them. A two-line note in a simple text file dated and titled with the change description has saved us hours of guessing months later about why a routine started acting up. The note that reads “Swapped 2.4 GHz channel from 6 to 11 on May 12 to dodge new neighbor AP” answers questions you would otherwise have to re-derive from scratch.
Standards, Alliances, and Why They Matter
The smart home category is governed by a handful of industry alliances that publish the specifications underlying every device on the market. Understanding which alliance owns which spec helps you predict which products will work together and which will not.
The Connectivity Standards Alliance (formerly Zigbee Alliance) owns the Matter specification and the Zigbee specifications. Specifications are public; certified products carry a logo and a certification ID. Z-Wave Alliance handles Z-Wave with similar certification rigor. The Bluetooth Special Interest Group governs Bluetooth Classic, Bluetooth Low Energy, and Bluetooth Mesh. The Thread Group governs Thread, the IPv6 mesh protocol used by many Matter devices.
IEEE working groups publish lower-layer specifications: 802.11 for Wi-Fi, 802.15.4 for the radio underlying Zigbee and Thread, and 802.3 for Ethernet. These standards rarely change in ways that break existing devices, which is why they are the most reliable foundation to build on.
Compatibility logos on the box are not marketing fluff. A Matter logo means the device passed a certification suite run by an accredited test laboratory. A Works with Apple Home logo means Apple has independently validated the integration. These markers are far more reliable than a vendor’s own compatibility claims.
Power, Heat, and Reliability Engineering
Smart home devices fail in predictable ways. Power supply electrolytic capacitors dry out after roughly 5 to 8 years of continuous duty. Wi-Fi chip solder joints crack under repeated thermal cycling. Battery cells in sensors swell after deep discharge cycles. Understanding these failure modes helps you choose hardware that survives and recognize when something is about to die.
Heat is the single biggest accelerator of electronic failure. Every 10 degree Celsius increase in operating temperature roughly halves component life per the Arrhenius equation. A smart plug running at 55 degrees Celsius will fail noticeably sooner than the same plug running at 35 degrees Celsius. Ventilation, load derating, and avoiding stacking devices on top of each other extend service life substantially.
Always-on Wi-Fi devices consume 0.5 to 2 watts of standby power continuously. A dozen smart bulbs and plugs in a typical home together draw 6 to 24 watts around the clock, totaling 50 to 200 kWh per year. Aggregate that across the install base and the energy cost is real, though typically far smaller than the savings unlocked by automation.
Privacy, Telemetry, and Local-First Practices
Cloud-connected smart home devices ship a steady stream of telemetry back to vendor servers. The data set varies by vendor and product class but commonly includes device on/off events, brightness changes, motion triggers, voice command transcripts, account interactions, and firmware version reports. Some vendors anonymize aggressively; others retain identifiable history for years.
Local-first architectures keep that data inside your home. Home Assistant, Hubitat, and Zigbee2MQTT operate entirely on local hardware with no required cloud connection. Matter-certified devices speak directly to local controllers and only reach the cloud when remote access is enabled. The tradeoff is operational complexity: local-first requires you to manage backups, updates, and uptime yourself.
Periodic privacy audits help. Review which voice commands have been retained, what data your vendor account holds, whether any device shipped with a default password still in place, and whether older devices have been removed from accounts after disposal. A factory reset before disposal is essential; selling or donating a device without resetting leaks the previous owner’s Wi-Fi credentials and account binding.
The NIST IoT cybersecurity guidance provides a practical framework for evaluating consumer IoT security posture. Devices that follow even part of the guidance (unique default passwords, encrypted communications, support windows that cover the expected device lifetime) make a meaningful difference in real-world security outcomes.
Bringing It Back to Restoring Unresponsive Hardware
Every administrative baseline in this technical index loops back to resolving network connection loops or credential corruption via a clean factory reset sequence. Restoring local firmware arrays allows you to maintain stable automated spaces and avoid orphan device endpoints inside your ecosystem logs.
Treat this guide as a living reference. Revisit individual hardware profiles quarterly to keep your networks optimized. Related techniques worth studying alongside this overview cover factory reset Kasa plugs, Wyze plug resets, Tuya smart plug resets, and dealing with plugs that are stuck or unresponsive, each of which strengthens your underlying system resilience over years of continuous deployment.
Frequently Asked Questions
Will factory resetting my plug delete my cloud voice automation scenes?
No. Your configured voice commands and routines live entirely inside your cloud platform account (Alexa, Google Assistant, or Apple Home), not on the edge endpoint hardware. Once the device is re-paired under its original name, existing voice mappings will automatically resume function.
Should I remove the smart plug from my smartphone app registry prior to performing a physical reset?
While not strictly mandatory, it is highly recommended to explicitly delete the old instance from your application profile first. This step cleans up stale network database entries and eliminates phantom pairing conflicts during setup initialization.
Is it possible to trigger a true factory reset sequence remotely?
No. A comprehensive factory clear mandates physical access to the device to complete the structural button-press arrays. While many smart apps offer a “soft reset” or reboot utility, these loops merely cycle the processor rather than clearing security configurations or stored Wi-Fi credentials.
How long should I wait to initialize my phone app once the plug’s LED begins blinking?
It is best practice to pause for roughly 10 to 15 seconds after the rapid pairing sequence initiates before running your app’s discovery scan. This window gives the internal microcontroller enough time to stabilize its wireless transceiver radio stack.
Related Reading & Reference Sources
Inside FuturoTech:
External technical references:
- Home Assistant integrations registry
- Underwriters Laboratories UL 962 safety standard
- NIST IoT cybersecurity guidance
Your Turn at the Bench
Drop a comment with the exact bulb, plug, hub, or assistant you are wrestling with. Share the build, paste your routine logic, or tell us which step on this guide finally broke the deadlock in your setup. If this walkthrough saved you a teardown, pass it along to the next hobbyist staring at a blinking LED.